
How to choose a radio-controlled car?
Radio-controlled cars: what is the difference between them?
First of all, decide on who the car is intended for. Of course, for children you should buy the simplest option of a small size, and it’s better to immediately buy a couple, so that the first one can be immediately replaced with the second one in the event of a serious “accident”, or for joint rides with one of the parents.
For beginners who first take the control panel in their hands, low-cost options of small dimensions are also suitable. In this case, it is worth considering models with an electric motor and in the RTR configuration, that is, ready to run (nothing needs to be assembled, painted, etc.).
For serious and enthusiastic users and professionals, models that require additional assembly, as well as models with an internal combustion engine are suitable. The latter need careful and proper care, as well as some knowledge of the principles of the device.
Key features of RC cars
First of all, the type of engine. Electric cars are easier to maintain and much more economical than models with an internal combustion engine. In turn, electric motors are divided into collector and brushless. The latter are considered more reliable and durable, but the price of models with such engines is higher.
Another important parameter is the scale of the car. Of course, it’s a matter of taste what size car to get. Whether it will be a huge car that can overcome significant obstacles, or a small frisky model for racing and spectacular drifts – it’s only up to you.
Among others, there is also such a parameter as moisture protection. The presence of good moisture protection will allow you to ride in the rain, in the snow, and through puddles. And this is much more fun than just racing on a dry surface – a lot of sprays and splashes will guarantee delight, joy and fun, and not only for children.
The difference in purpose – the type of car body
The most important thing when choosing a radio-controlled car is to decide where and how you want to drive. Will it be fast off-road driving, drift on the pavement or overcoming serious obstacles and dirt? Are you going to ride alone or compete with like-minded people? Do you like small cars or impressive monsters with huge wheels? Depending on the answers, you can pick up a radio-controlled car with a certain type of body. Let’s consider the main types and their purpose.
Radio-controlled buggies are cars with a small body designed for driving on light off-road roads (gravel, dirt, sand). Competitions are often held for these models. Buggy is quite recognizable: high suspension, lightweight small body, powerful wheels. Main characteristics: low center of gravity, excellent handling, as well as a wide “evil” tread. These babies can accelerate to good speeds, overcome difficult tracks, do small jumps, and in some cases even drift!
Radio-controlled crawlers are slow and persistent models with a small body, but with powerful huge wheels, high ground clearance and the same suspension travel. These models are suitable for those who like to slowly solve complex problems – overcome slow tracks with stones and logs, mud puddles and high rises with low speed.
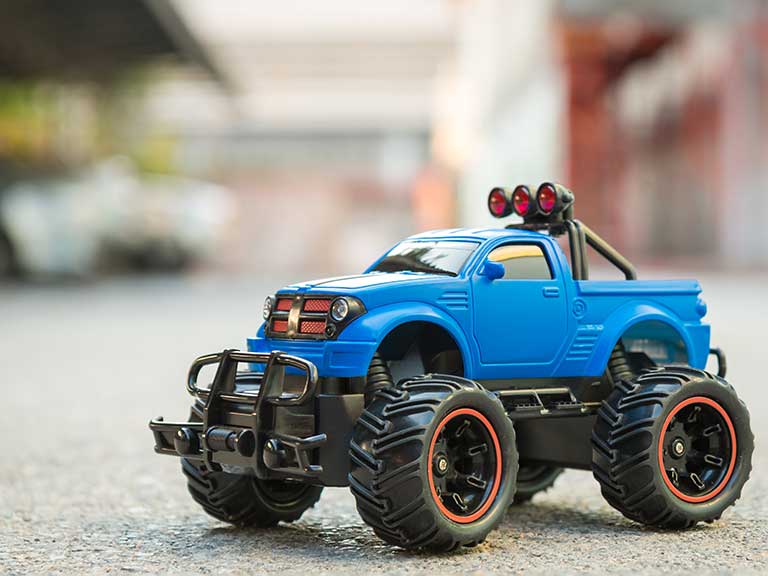
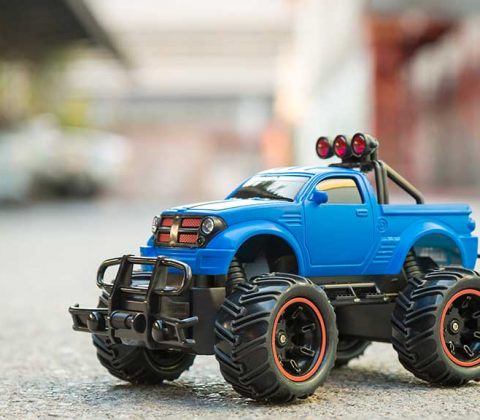
Very similar to a crawler is a monster truck. Perhaps this is one of the most popular models. And there is a lot to love it for! It has an impressive appearance: huge wheels, high ground clearance, pickup body. Monsters also know how to pass through serious off-road and jump from ski jumps. Some models can develop high speed, as well as ride only on two rear wheels.
Rally models – these are cars for speed lovers. Rally cars will give an unforgettable experience of steep turns and rides at high speeds. Such models drive only on flat surfaces or on specially constructed tracks. In this regard, rally cars are simply created for competitions! In addition, usually the models quite accurately copy the appearance of the real cars.
Truggie is another type of radio-controlled car designed for both frisky driving on flat roads and for overcoming off-road. Truggies are a kind of hybrid of a buggy and a monster truck, which has absorbed the best features of both types.
Radio-controlled trophies are one of the most interesting types of radio-controlled cars! It is suitable for those who may be interested in constant hard work on the model: these machines have just an incredible set of additional accessories to give greater resemblance to its real prototype! Spare wheels, cans, winches and much more – everything you might need on a real off-road ride in a trophy class car.
Short course is a sports vehicle. In most cases, it has a high copy capacity, as well as moisture protection to overcome difficult sections of the route. Perhaps the most adapted of all “survival” models, as they have impressive protection from bumps and collisions.
Highway models are designed for fast competitive races. High copy capacity, strong body, excellent aerodynamics – all that is needed to create the atmosphere of real professional racing.
RC custom vehicles and trucks
According to gagadget, these models are worth to be in a separate category. They are mainly intended for playing with children. Most models are designed to maintain functionality: the crane turns and picks up the load with a hook, the loader carries heavy loads, and the dump truck can unload bulk material. Such “skills” of models will definitely not leave children indifferent!


How to Choose Pond Aerator
Choosing pond aerator or reservoir is a task that does not have a strict and precise solution. If only because the oxygen demand varies greatly throughout the year and depends on a number of parameters that are difficult to calculate. For example, in winter and summer, oxygen requirements may vary by more than an order of magnitude. The simplest (but also very approximate) calculation is based on the biochemical oxygen demand, BOD5. This indicator is determined in hydro-chemical studies and is widely used to assess water quality. The essence of this indicator is to determine the amount of oxygen consumed per liter of water during five days under standard conditions of analysis. For example, BOD5 = 10 mgO2/l means that one litre of water will consume 5 mg of oxygen and one cubic metre of water will consume 5 grams of oxygen during 5 days. Let’s make a simple calculation. Let’s assume that the pond area is one hectare (10000m2) and the average depth is 2 m. In this pond there will be 20000m3 of water, and for 5 days in the whole pond oxygen consumption will be 20000m3 x 5g/m3 = 100000 g. In recalculation for one day it will make: 100000g:5 = 20000g, or 833g in one hour (20000g:24h = 833g/hour). It approximately corresponds to quantity of oxygen which dissolves in water one aerator “Potok-Universal” by capacity 1,1 kw at 30 % of the initial maintenance of oxygen.
However, in addition to oxygen consumption by water itself, oxygen is also consumed by soils and the bottom layer of water. If the silt layer is significant, the oxygen consumption in the bottom water layer and soils can be much higher than in the water column. This can only be determined by complex experiments with special equipment. We recommend adjusting the oxygen consumption in the ground as follows. If the silt sediments are small and the pond is new, increase the oxygen demand by 10%, if the bottom sediments are significant and the pond has been in operation for more than 3-5 years by 30%. For an older pond with more sediments, the correction should be 30-60 %. For a pond that shows signs of waterlogging (smell of hydrogen sulfide from water, its stale taste, abundant “flowering”, unpleasant taste in fish), the oxygen demand determined on the basis of BOD5 should be increased by 2-3 times.
The third factor to consider when choosing an aerator for the pond is the amount of fish in the pond. Calculation of this value is not very difficult. It can be assumed that one kilogram of fish in summer consumes about 150 mg of oxygen per hour (or 150g of oxygen of one ton of fish). Therefore, if there are two tons of fish in the pond, it will consume approximately 150g/t x 2t = 300g of oxygen. Summing up the figures, we will very approximately determine the amount of oxygen the pond needs. This is very approximate because we do not take into account the oxygen produced by photosynthesis, we do not take into account the oxygen intake from the air, we do not take into account the amount of oxygen entering and leaving the pond with water flowing in and out. Nevertheless, this very formal method of calculation gives acceptable results and avoids big mistakes in choosing an aerator for a pond.
The penultimate step in the calculation is to determine the capacity of the aerator. Injection-type aerators, to which our products belong, produce about 800-1000 g of oxygen per kilowatt per hour at 30% oxygen saturation of water. (The efficiency of an aerator strongly depends on how much oxygen the water is saturated. For example, if the water is 80% saturated, only about 200g of oxygen per 1 kilowatt per hour will dissolve in the water). Let’s assume that the total oxygen consumption in the pond is estimated at 1800g per hour. We divide 1800g by 800g and get that capacity should be 2,25 kW per hour. Such capacity has one aerator “Potok-Universal” 2.2 or two aerators of the same type with engines of 1.1 kW each.
Additional factors that must be taken into account when choosing an aerator.
- Configuration of the pond. In long ponds, it is advisable to use several aerators in order to cover the maximum area of the pond. In this case, you can also use the Potok-Tandem aerator, which has two engines that direct the water flows in opposite directions.
- Purpose of the pond, type of fish farm. For example, when growing trout, or in ponds for paid fishing, where you need a good glut of fish, the capacity of aerators should be maximum to maintain oxygen content above 60-70% of normal saturation.
- 3. The period of use of the aerator. If the aerator is used only in winter, its capacity may be lower than it is needed in summer.
- The strength of the coastline and its tendency to wash out. If shores are easily eroded, it is better to use the Star Series aerators, in which the water flow is distributed in 8 directions and quickly extinguished.


Weed control methods
The word “weed” is familiar to most gardeners to pain (in the lower back, tired of endless weeding). And of course, we want to get rid of these “enemies” forever. And it is desirable – without extra work. Well, let’s look for ways…
I must say at once: my list does not claim to be exhaustive. Moreover, the methods of weed control collected in it are very different – there are “lazy” among them, and there are those that will require effort. Some methods have a lot of opponents. But my deepest conviction is that in order to choose, you must know. You can not blindly rely on someone else’s opinion and experience – you have to look for and choose what suits you and it is you who works best.
So I invite everyone to discuss: share your experiences, confirm or deny the effectiveness of the methods and techniques described, complement and expand my list!
Method 1 – Traditional
A lot of people are arguing with the fact that the soil needs to be moistured with pond aerator every day. We’re not going to argue – it’s not about that now, it’s not about how the land is cultivated. Those who are interested in this question, I recommend reading the article Dig or not dig? That’s the question… and numerous comments to it. And to control perennial root weeds, digging and plowing remain one of the most effective methods.
Yes, it’s quite a time-consuming process, and it has its drawbacks. But here, let’s say, I have an area on which two years ago, nothing but wheatgrass, nettles and dreams were growing. How can you quickly reclaim land from them without digging it up, if its entire top layer consists of only one root? I have not yet found the answer to that question. That’s why I’m digging, carefully selecting the roots by hand.
There are different options here. For example, digging not with a shovel, but with forks – so much less chance to damage the root, cut it into pieces, from which then will grow new weeds.
You can plough the virgin land with a cultivator, motorbike or tractor (if available). In this case, choose the roots will be harder, but from experience I will say: this treatment helps to get rid of wormwood, burrows and the like plants with a very powerful and deep root system – shovel them uproot tormented.
Method 2 – chemical
I don’t like this method myself and I never use it. But perhaps for some situations it is the only acceptable method, although I would not recommend it to be used in the garden under any conditions – the poison, which is herbicides, is poison. Besides, for some plants (for example, the same borschevik Sosnovsky) these drugs have practically no effect.
And armed with knowledge, you can look in our catalog, which includes proposals of many large garden online stores to choose the appropriate drugs for weed control.
Method 3 – Biological
Plants (both cultivated and weeds) need light in order to live and develop. In the dark, life processes in plant tissues slow down or even stop at all. Over time, this can destroy not only the shoots, but also the root system, which does not receive the nutrition it needs.
Covering the soil with any dense opaque material (black film or mulch microfiber; cardboard; roofing felt; boards, etc.), we deprive the weeds of the conditions they need for life, and they die. It is true that we have to be patient: one season is sometimes not enough for this. In addition, on the surface of such a shelter (especially non-woven material) gradually accumulates a layer of land in which the seeds – and everything starts over.
A successful alternative to synthetic shelter is organic mulch. Only pour it with a thick layer (5-10 cm minimum). Suitable and sawdust, and cut grass, and wood bark – the different types of mulch we have already talked about, more about its use is described in the articles Successful types of mulch for garden and vegetable garden and 6 popular options for autumn mulch for every taste. And in the following video you will see how you can combine materials: in this case, it is cardboard plus wood bark.
Method 4 is a substitute for
Where do weeds come from? That’s right – where there’s free, empty land. There are usually few weeds on the land that is being planted, and these are more likely to be annuals, which are much easier to cope with. What’s the conclusion from here? There should be no empty land!
Part of the problem is solved by the mulch, which was mentioned above. But there are other options. For example: a seedbed is released after early greenery or onion harvesting – we sow it with siderates or re-sow fast-growing vegetables in summer.
Sealed plantings are also a solution. Of course, compaction must be done sensibly so that the plants are not too crowded and the harvest does not suffer. But with the right approach you can also get beautiful seedbeds, and get rid of weeds – they just have nowhere to grow.
And siderat seeds for soil improvement and weed control can be found in our catalog, where you can find offers of large garden online stores. Choose siderates.


How do you travel with a dog in a car?
For the dog to not stain or scratch the seat with its claws, you can buy a cover for the seats, which will not cost a lot either.
Wraps or covers come in many forms and are designed for both front and rear seats. There are also covers for door panels. They are also not very expensive, but they protect plastic, leather and wooden linings well from animal claws.
Small dogs can also be carried in carrying bags or carriers. There are many options, from rag to plastic folding. The price depends on the material and type. The main thing is that they are attached to the seats with seat belts, or even through the Isofix fastener, which ensures the animal and you proper safety on the road. It is clear that a large animal cannot be put in such a carrier, but if you are sure that your buddy subsequently does not grow into a polar bear, buy such a device. After all, it is possible to carry a pet in it not only in your car, but also in public transport.
By the way, it would be nice to partially isolate large animals traveling on the second row, so that the dog, in a fit of feelings, does not climb, licking you behind the ear and thereby does not distract you from controlling the driveway. To do this, you can install a mesh screen between the backs of the front seats. It costs about 10$, allows the dog to be near you and at the same time not interfere with your control of the road. And since the screen is mesh, it does not overlap the view and allows you to control what is happening behind through the driving mirror. If you prefer not to be distracted from the road when turning back to see what your dog is doing there, you can buy an additional panoramic mirror and attach it to the windshield using a sucker so that you can see what is happening on the second row. It costs 5-10$ if not less.
Often, dogs lack air in the cabin, especially if the car does not have air conditioning. In order to prevent this situation, drivers are forced to open the windows where the dogs stick their faces out. And this is not always safe. An annoyed dog may try to jump out of the window when you open it, and although it is fastened, it still has a certain degree of freedom.
In order to let the dog breathe freely and at the same time not try to lean out the window, there are special grids / gratings. Foldable, made of plastic, it is inserted between the lowered glass and the upper edge of the door, providing both an influx of fresh air and an obstacle. By the way, these devices are very useful if you often leave the dog in the car in the parking lot. Your fluffy friend will definitely not be stuffy, especially if you ensure the flow of air not from just one, but from two sides. A set of a pair of gratings will cost about 20$.
So, having decided to go on a road trip by car or just to a grocery store with your dog, think about whether you have done everything to make it safe. After all, dogs are our friends, and friends must be taken care of.
Types of canvases for painting, which to choose
Choosing a canvas is probably one of the hardest tasks for a beginner artist. Canvas is the basis for your masterpiece, and if you choose a canvas incorrectly, then the masterpiece may turn out to be “wrong” or simply fail. By choosing a canvas you seem to be defining the technique and method of painting. What is the secret? Let’s take a closer look at what a canvas is and how to choose it correctly.
When choosing a canvas, pay attention to the material. You have seen the abundance of canvases now offer art shops and websites? Do not choose a canvas at random, a little knowledge will help you decide easily and quickly.
From what material to choose a canvas for oil paints, cotton or flax?
- Cotton canvas to choose from or not.
- Choose cotton canvas or not
Cotton canvases are probably the most common today and are in constant demand. Choosing a cotton canvas, you will not miss, the material is “obedient”, it is pleasant and convenient to paint pictures in any technique oil. As far as I know, cotton canvases were the first to be used in the USA, only in the last century. As you understand, they are not even a century, so it is impossible to check how long they are durable.
On the upsides of choosing cotton canvas:
- the price of cotton canvas is not as high as linen canvas;
- at a good stretch it’s good and comfortable to write on cotton canvas;
If you talk about the drawbacks of cotton canvas, it’s worth noting:
- it is subject to the accumulation of moisture.
- is easily exposed to mechanical influence;
- over time, the cotton canvas can sag.
- Is it worth choosing a linen canvas?
- Is it worth choosing linen canvas?
Having chosen a linen canvas you will repeat old masters who painted their masterpieces only on linen canvases. Flax has proved to be the best material for canvas. Paintings on linen canvases have been painted for centuries, unlike cotton which appeared as a canvas material not so long ago. The choice of linen canvas for painting is “noble” and the best among artists.
If we talk about the advantages of linen canvas, it is worth noting:
- flax does not absorb moisture unlike cotton;
- it’s less prone to sagging over time;
- it’s not so exposed to mechanical damage;
What about the disadvantages? Are there disadvantages when choosing linen canvas?
Yes, they do:
- linen canvas is much more expensive than cotton canvas;
- it weighs a little more than cotton (if we talk about exhibitions and mailing pictures);
- Synthetic canvas, choose or not.
- Synthetic canvas, choose or not.
I have to be honest, at the time of writing this article, I have never used synthetic fiber canvas. Moreover, in the shop where I buy my art materials, I have never seen a synthetic canvas. This is of course the trend of the new era in painting and most art salons do not yet risk bringing them. Artificial canvas – how you can choose this, will think most who read it. But time goes on, and as before no one could even think about good synthetic brushes, the same now with canvases.
Pros of synthetic canvases:
- I don’t think anyone’s going to argue with the fact that synthetics don’t rot or absorb moisture;
- synthetic canvas will be lighter than natural materials;
- The minuses of synthetic canvases:
- as artists say they have not passed the test of time;
- few have practiced on them (I’ve never written on them myself), it’s hard to tell how it behaves when you write.
- There are also combined canvases: cotton-flax, cotton-synthetics, I am personally skeptical about them. Different materials behave differently and combinations may not behave predictably.
There are three types of canvas grains:
- fine-grained canvas. Such canvases are distinguished by their almost smoothness, graininess of the canvas is very fine and it is not chosen by many people now. On such canvases it is good to write with glaze, applying one layer of paint for canvas after another. It’s a good choice if you want to paint a portrait.
- the middle grain of the canvas. But the canvas with average grain size, for often one of the most popular. On such canvases it is convenient to write in paste, and also it is possible to write in glaze.
- coarse-grained canvas is perfect for working as a mastichein. Such canvas holds texture painting well without visible deformation.
Which canvas is primed or not?
The choice is obvious, your canvas must be primed to be painted with oil paints. Not primed canvas is not suitable for writing, it is 100%. But as always you have a choice: to buy a primed canvas, or not primed and naturally primed it yourself. How? Shops sell art primer, which well.


How to choose a Projector
If you haven’t fully understood the projectors yet and are not sure what works for you, then this article is for you! At least, I wrote it with the intention of putting everything into shelves and making it as simple as possible. Also, I suggest to consider projectors as a kind of modular constructor – we take an “ordinary projector” featured in https://bestrobotsguide.com/ as a starting point and look in which direction you should go according to your tasks. Once you’ve decided on the type of projector and the functionality you need (and don’t need), you’ll narrow your choice down to a few models.
This article is intended to be the most general and, in addition to the projector types, it will discuss the most important features that are inherent to most projectors. However, you will find some links to more specialized articles devoted to a detailed review of a projector type or feature.
The most standard projector is also called a budget “office projector” or “projector for business and education”. It costs from $700 (maybe less) and has a brightness of about 3000 lumens, which allows it to give a legible image in well-lit rooms of schools, offices, classrooms of universities and so on. There are two things in the budget.
First, the budget projector does not have any exaggerations in terms of image quality – it should be sufficient, but not more.
Secondly, additional functionality of such projectors is minimal. It is, first of all, a minimum set of tools that provide freedom in choosing the place of installation of the projector – the distance from the screen and the height of installation.
On the other hand, recently the requirements to projectors for schools and offices have become “outdated”. Among these requirements is a large number of not very expensive but useful features, such as the control of presentation from the projector console or the presence of digital correction of image geometry, which allows, even if at the expense of sharpness, but still, to place the projector above / below or left / right of the optimal position.
And don’t forget that at the high brightness required by the projector to fight external light to maintain high legibility and image quality, the projector should remain within 3kg and the body should be compact and easy to transport.
Here are two separate articles on projectors for schools and multimedia projectors for presentations.
So, we’ve touched upon an ordinary projector – most models on the market belong to this type. All other types of projectors have come from it and if you don’t have enough basic capabilities, you will definitely go in one direction:
- You need more brightness for large rooms and screens – “installation projectors”.
- Need more functionality – “short-focus projectors”, “network projectors”, higher resolution, etc.
- Need better image quality in the dark – “projectors for home theater”.
- You need the minimum dimensions at low brightness – “pocket projectors”, “peak projectors”.
Home projectors
I would like to deal with this category right away in order to remove some questions. Obviously, home projectors are designed for showing movies as well as for video games.
If you are interested to read a detailed and extremely boring article about home projectors, here it is.
Here we will also talk about home projectors in the most general terms. “Home projectors” of the initial price group come from “ordinary” budget office / school projectors. In total, there are three resolution options for home projectors. The standard is Full HD (1920×1080), a very economical option is 1280×800 (WXGA, HD). Well, at the price above $5000 somewhere “beacon” 4K projectors.
Bright representatives of full HD projectors are BenQ W1070 and Epson EH-TW5200. By the way, a good selection of full HD projectors reviews from Projectorcentral.com is available here.
For the price of Full HD home projectors start from about $900, but their price increases as the main features improve. The main thing that distinguishes home projectors from ordinary projectors is the room conditions. If a conventional projector is aimed primarily at a partially lit room, the user will want the best image in the home environment by turning off the light. When the light is turned off, a completely different principle of achieving high image quality starts to work. If, in a lighted room, legibility and contrast are achieved primarily by the brightness of the projector, then in the dark too high a brightness becomes undesirable and there is a clear standard regarding the maximum brightness of white. If your maximum brightness is fixed, then contrast is achieved by improving black, that is, reducing the brightness of black light.